Power BI’s Deployment Pipelines (Premium) feature introduces the ability to apply native Application Lifecycle Management (ALM) processes within the Power BI Service. In this blog post we’ll go through how to set-up and use Power BI Deployment Pipelines using a non-Premium Power BI tenant and the Azure Power BI Embedded service.
The feature allows Report Creators and Power BI Administrators control over deploying new and changed Power BI Dashboards, Reports and Datasets via a 3 stage process. Changes can be deployed to a Development stage (Workspace), pushed to a Test stage before finally being pushed to a Production stage. Each stage in the pipeline is assigned to a Power BI Workspace.
It is worth noting that in November 2020 there will be a public preview of a Premium Per User licensing tier which will allow a user access to the Deployment Pipelines feature. For example, several Report Creators and Power BI Admins could be assigned a PPU licence to use the Deployment Pipelines feature.
Usage Scenarios
Organisations that do not have Power BI Premium can still take advantage of the native ALM features that the Power BI Service offers by leveraging the Power BI Embedded (A SKU) capacity in Azure. An organisation can create an Embedded SKU, assign a Workspace, create a pipeline to deploy to development, test and production workspaces, then remove/pause the Embedded service once the deployment has succeeded.
As the Embedded SKU offers pay-as-you-go hourly pricing, an organisation can test the Deployment Pipelines feature prior to a possible Power BI Premium (P) SKU purchase. This enables the organisation to test features which may be relevant to their Power BI Architecture.
An organisation with no roadmap to purchase Premium can still utilise Deployment Pipelines in their Power BI architecture.
Power BI Deployment Pipeline Feature
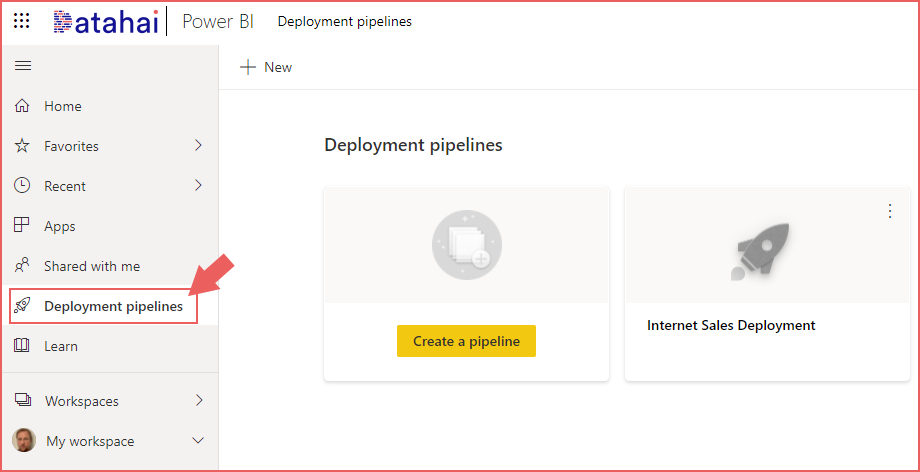
The feature is available within the Power BI Service and is accessible from the main navigation area on the left, as shown in the following image.
Service Considerations
The Power BI Embedded capacity is a service which is managed through Azure. Once an Embedded service is created, it can be assigned to a Power BI Service Workspace as a Premium capacity. There are considerations when using the Embedded service:
- It is billed per hour therefore for each hour that the Power BI Embedded service is running, costs will be incurred. However the service can be paused to stop billing. Pausing the Embedded service will stop the Deployment Pipelines feature from working on Workspaces, however once resumed the feature will continue to work as normal.
- Sizing the Embedded SKU is important due to the 3 stages that Deployment Pipelines use. Each stage being assigned to a separate Workspace. Any data loaded into datasets contained within these Workspaces will contribute to the overall cache usage in the Embedded tier. E.G if each Workspace contains 500MB of data then the Embedded cache will be using 1.5GB cache. This also does not take into account cache required when refreshing data. However, the amount of data loaded could be limited if deployment parameters were used (discussed in the Parameters and Data Source Rules section) as this allows configuration of the data source(s). The Development and Test workspaces could be configured to load data from a smaller source data set.
Deployment Pipelines Limitations
The Deployment Pipelines feature has been generally available since September 2020 and there are current limitations with this release such as the inability to rollback deployments and no ability to version control the deployments. Therefore it is important to ensure that reports and datasets are version controlled in a source control system. There is also a limitation in the objects that are supported for deployments, dashboards, reports and datasets are all supported but there is currently no support for data flows.
Example Object Dependencies
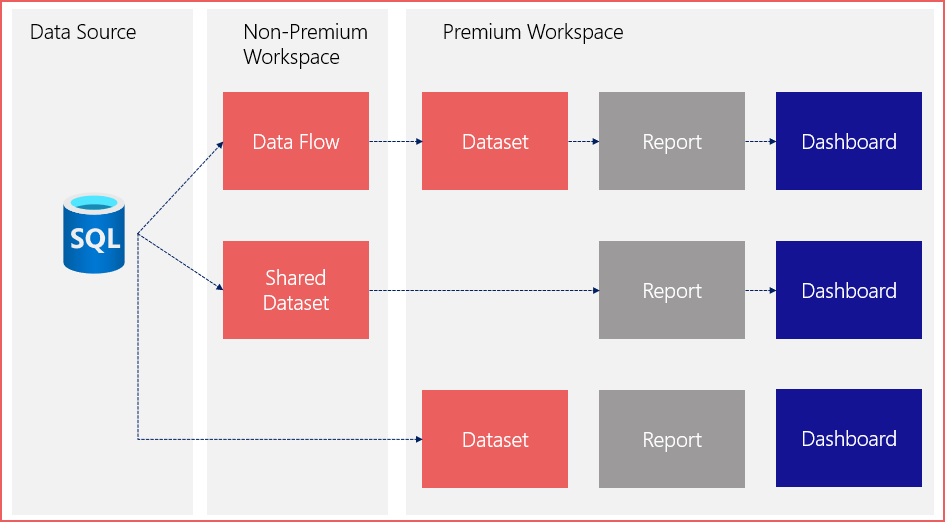
Various deployment scenarios are supported which allows Data Flows and Shared Datasets from Non-Premium Workspaces to be used as sources for Datasets and Reports that are within workspaces assigned to the Embedded capacity to allow Deployment Pipelines to run. It must be noted that the Workspace is only required to be assigned to the Embedded capacity when the Deployment Pipelines feature is being used. Once any changes are in Production, Workspaces can be returned to non-Premium status by removing them from the Embedded capacity.
The image below shows that a Data Flow and a Shared Dataset in a Non-Premium Workspace can be used by Datasets and Reports in Workspaces backed by the Embedded Premium capacity.

Deployment Pipelines Walkthrough
We will now create a Power BI Embedded capacity, create a Power BI Workspace, and assign it to the Embedded capacity. We will then upload the Financial Analysis report using Power BI Desktop to the new Workspace. We then create a Deployment Pipeline and work through deployment examples.
Prerequisites & Cost
A Power BI Pro licence and access to Azure with the ability to create a Power BI Embedded service. The cost of running a 3GB A1 SKU for Power BI Embedded is an estimated £0.78 Per Hour. Please take this into consideration before deploying the service.
Example Power BI Report
The Power BI Desktop report and Excel sample file which will be deployed to the Power BI Service is available at GitHub here. It is based on the example Financial data available within Power BI Desktop, Please note that this is a basic report designed to showcase the Deployment Pipelines feature.
Create Azure Power BI Embedded Service
- Login to the Azure portal at https://portal.azure.com
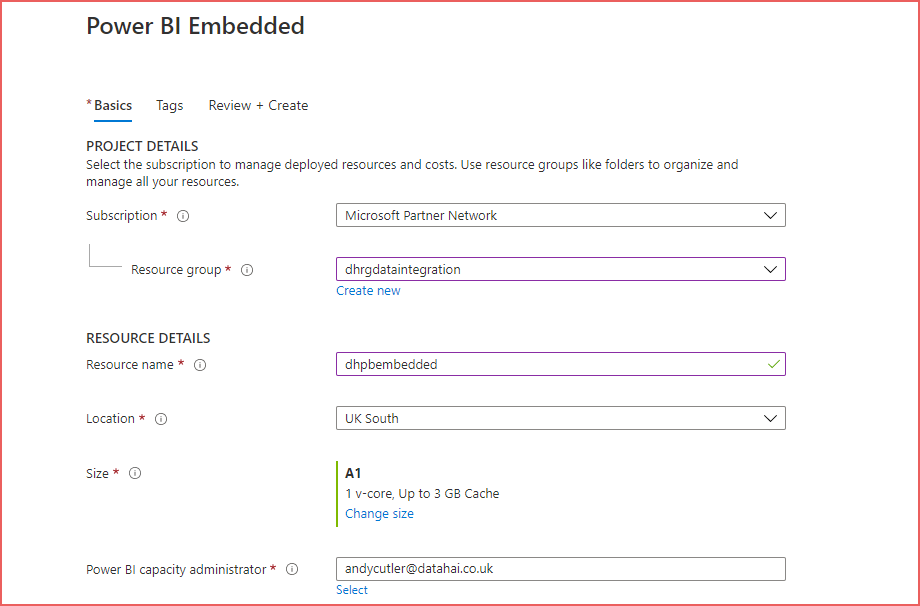
- Search for the Power BI Embedded service and select Add and complete the relevant fields as shown in the following image. Substitute the values appropriate to your Azure subscription.
- The service tier is set to the smallest A SKU which is 3GB Cache.
Create and Assign Power BI Workspace to Embedded Capacity
Once the Embedded capacity has been created in Azure, it can be assigned to a Power BI Workspace by following the next steps. For this example we will create a new Workspace to serve as the Development Workspace and deploy a report from Power BI Desktop.
- Login to the Power BI Service at https://app.powerbi.com
- Select the Workspaces option in the left menu and select Create a workspace.
- Name the workspace Financial Analysis [Development] and under the Advanced tab ensure that the Dedicated Capacity option is enabled and the Embedded capacity created in the earlier step is selected.
- Click Save.
It is also possible to assign an existing Workspace to an Embedded capacity by doing the following:
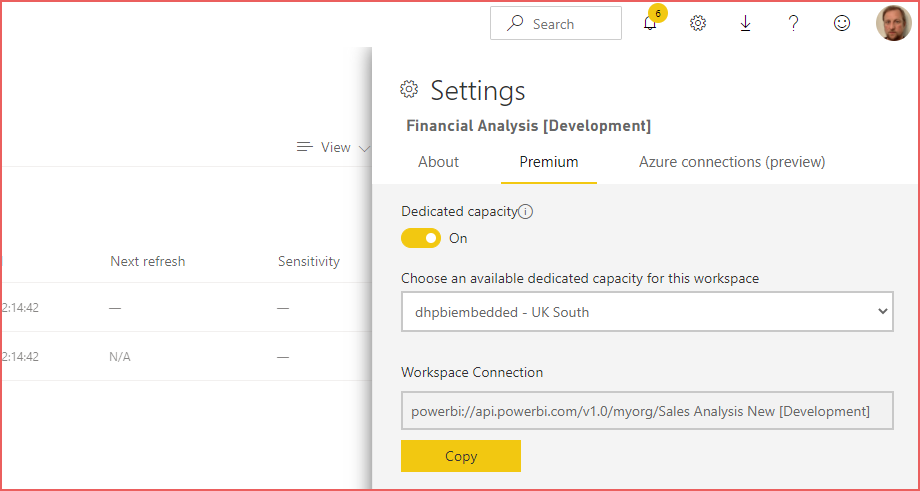
- Select the Workspaces option in the left menu and select the ellipsis (more) then select Workspace Settings.
- Select the Premium tab on the Settings area that appears on the right side. as shown in the following image.
- Activate the Dedicated Capacity option and select the Embedded capacity created in the earlier step.
- Click Save.
Deploy Report to Development Workspace
Once the Workspace has been created or an existing empty Workspace has been selected and assigned to the Embedded capacity, the Financial Analysis.pbix report can be deployed from Power BI Desktop to the Workspace. Currently the Excel file source is a local path and must be changed to a remote location such as Azure Storage to allow data refresh. Upload the Excel file to a location which the Power BI Service can access, for example an Azure Blob Storage account and container.
- Open the report in Power BI Desktop, select Data Source Settings under Transform Data and change the data source to the new location of the Excel file. Enter appropriate credentials.
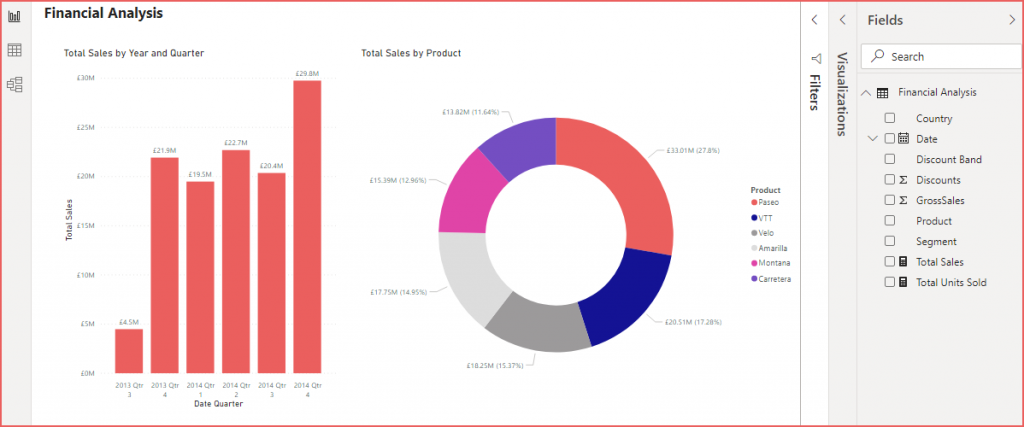
- Select Publish, select the Financial Analysis [Development] Workspace to deploy. The following image shows the initial report with a single table.
Create Deployment Pipeline
We will now create a new Deployment Pipeline and assign the Development Workspace to the Development pipeline stage. We will then deploy to a Test and a Production Workspace.
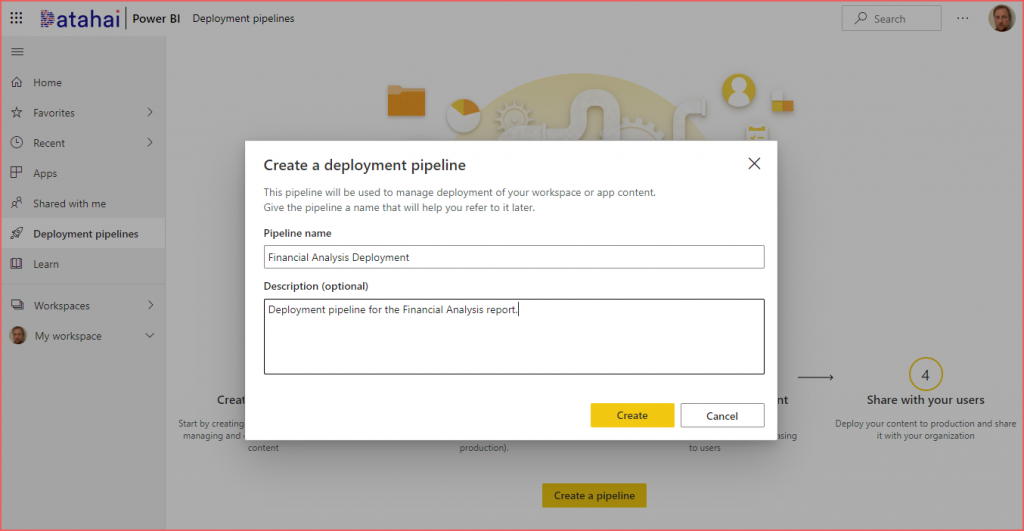
- On the main left menu in the Power BI Service, select Deployment Pipelines.
- Select Create a pipeline and in the pop-up box enter an appropriate name and click Create.
Assign Workspace to Development Stage
Now that the pipeline has been created, we will assign the development Workspace to the Development pipeline.
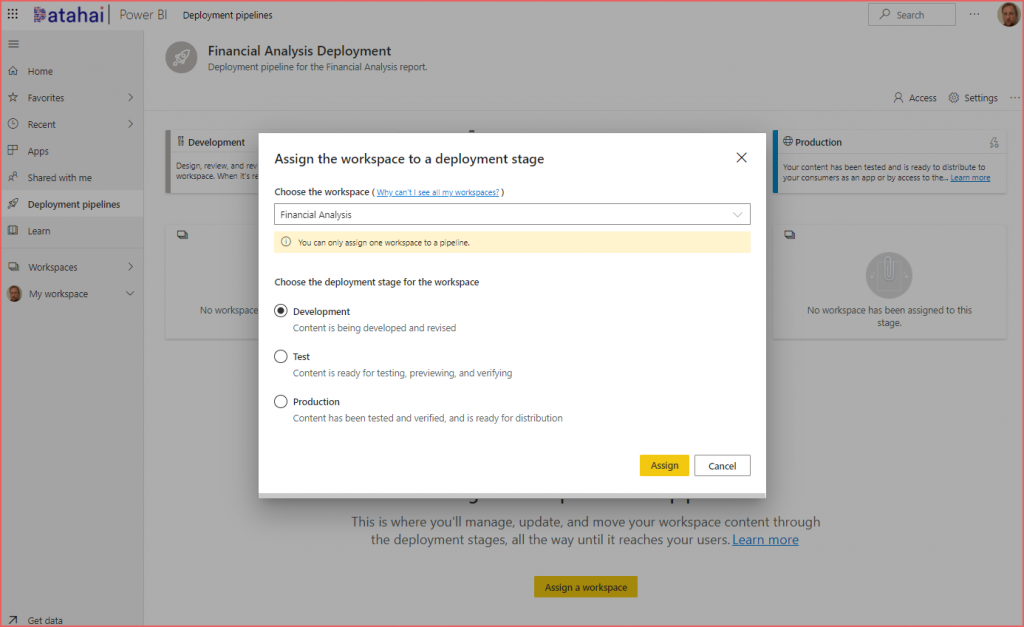
- In the newly created Deployment Pipeline, select Assign a workspace.
- Select the Financial Analysis [Development] Workspace in the Choose the workspace drop-down.
- Ensure that the Development stage is selected under Choose the deployment stage for the workspace.
- Select Assign.
Deploy to Test and Production Stages
Now that we have a report and its associated dataset in the Development Workspace, we can deploy these artifacts to the Test and Production stages. We will then rename the Workspaces to align with their usage and finally create a new Dashboard in the Development Workspace and compare the difference before deploying to Test and Production.
- Open the Financial Analysis Deployment pipeline.
- In the Development stage select Deploy to test to trigger a deployment to the Test stage.
- This will now trigger a deployment to the Test stage which will deploy the report and dataset, this may take a few minutes as this process also creates the Workspace when run for the first time.
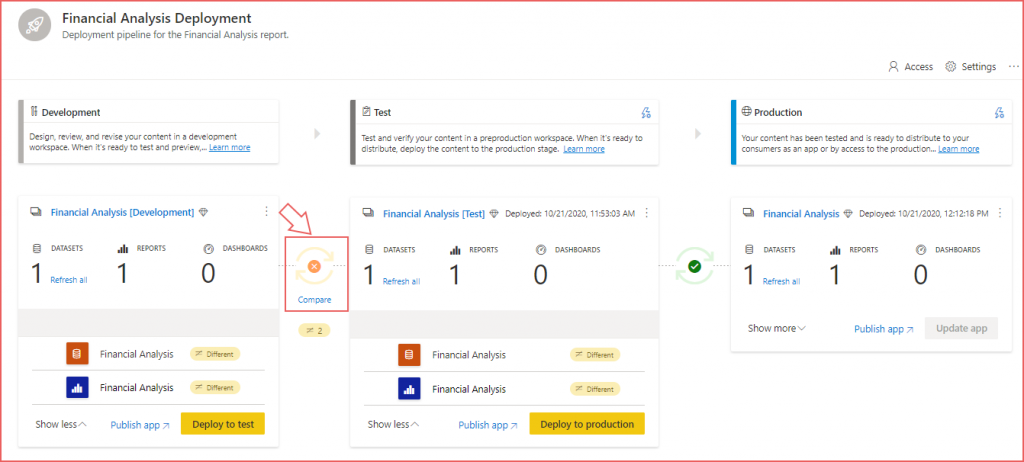
- Once the process completes, select Deploy to production in the Test stage to trigger a deployment (and initial Workspace creation) to the Production stage.
- One the process is complete the pipeline should look like the following image.

Rename Production Workspace
We need to rename the Production Workspace as the Workspace was created with a name of Financial Analysis [Production]. By opening the Workspace settings the name can be changed by dropping the [Production] suffix.
Making Changes to Power BI Desktop Model
We will now make 2 changes to the Power BI Desktop report and redeploy to the Development Workspace, this will trigger a compare with the Test stage.
- Open the Financial Analysis.pbix report in Power BI Desktop.
- Create a new Measure in the Financial Analysis report by right-clicking the Financial Analysis table and selecting New measure.
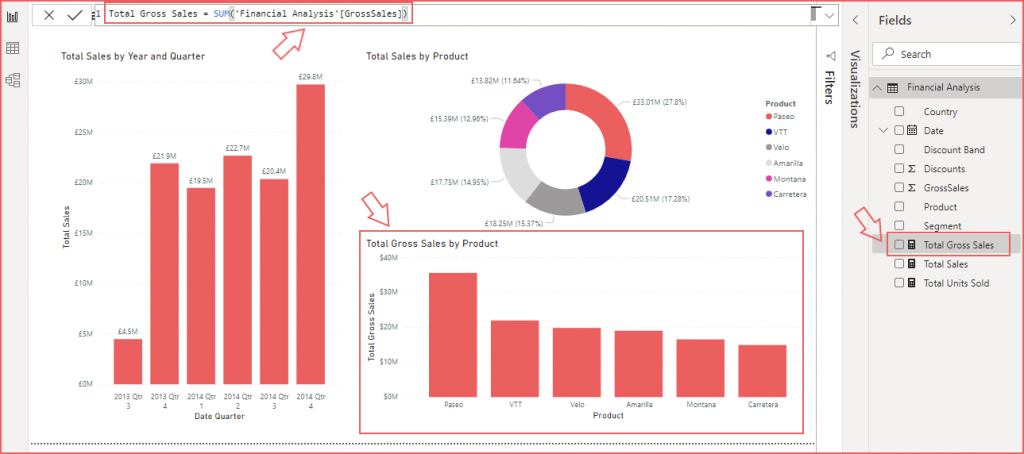
- Add the syntax Total Gross Sales:= SUM(‘Financial Analysis'[GrossSales]) and ensure the Currency format is applied.
- Resize the Total Sales by Product donut chart to shrink the vertical size.
- Select the Clustered Column Chart visual icon and select the new Total Gross Sales measure from the Fields pane on the right side.
- Drag the Product field onto the Axis of the chart.
- The report should look like the following image.
- Save the report and Publish to the Financial Analysis [Development] Workspace
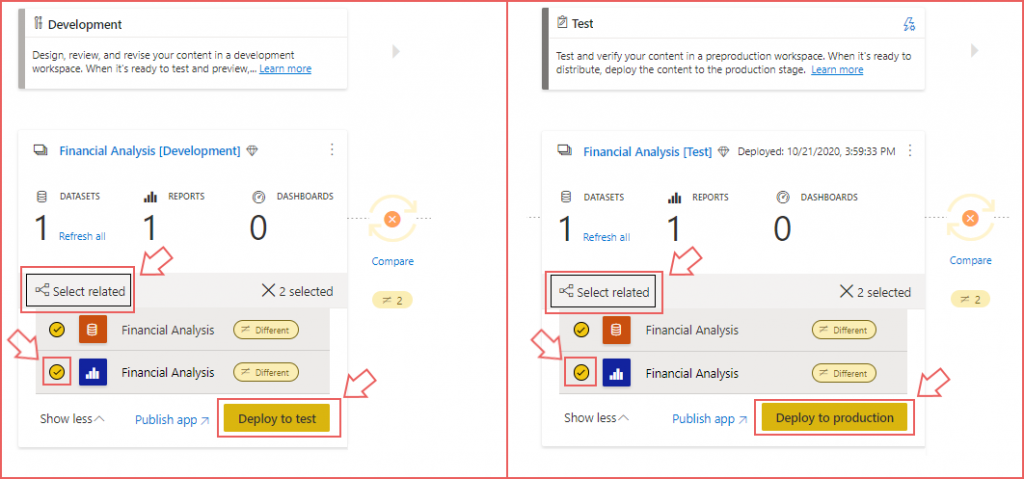
Once the report and dataset have been deployed to the Development Stage, the Deployment Pipeline will now show a difference between the Development and Test Stage via the Compare icon between the stages. By clicking Compare the differences will be shown. The following image shows that the Financial Analysis report and dataset have both been flagged as being Different.
Deploy Changes to Test and Production
Once the changes have been detected by the Deployment Pipeline, we can deploy to the Test and Production stages by completing the following steps.
- In the Development Stage, click Show more to expand the list of artifacts. Hover the mouse over the Financial Analysis report (blue icon) and select the check button that appears to the left.
- Above the artifacts names, click Select related to ensure the related dataset is also selected. This option is important if deploying more complex dashboards and reports with dependencies.
- Click Deploy to test and confirm.
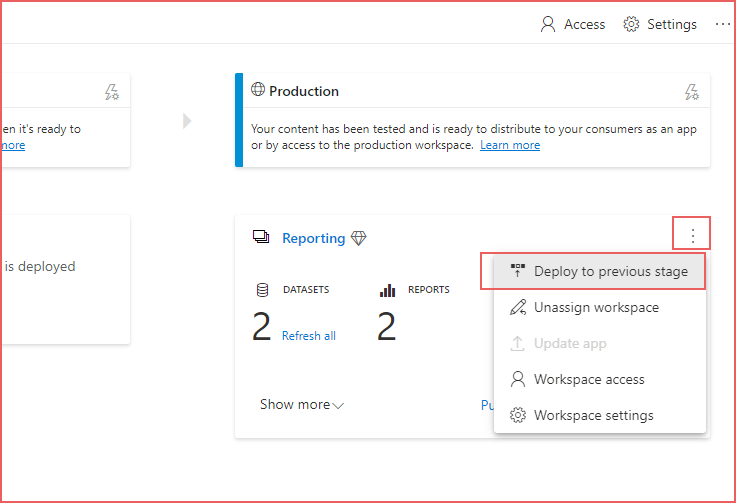
- Repeat the steps above to deploy from the Test to the Production stage.
- The image below shows both the Development and Test stages when deploying the artifacts.
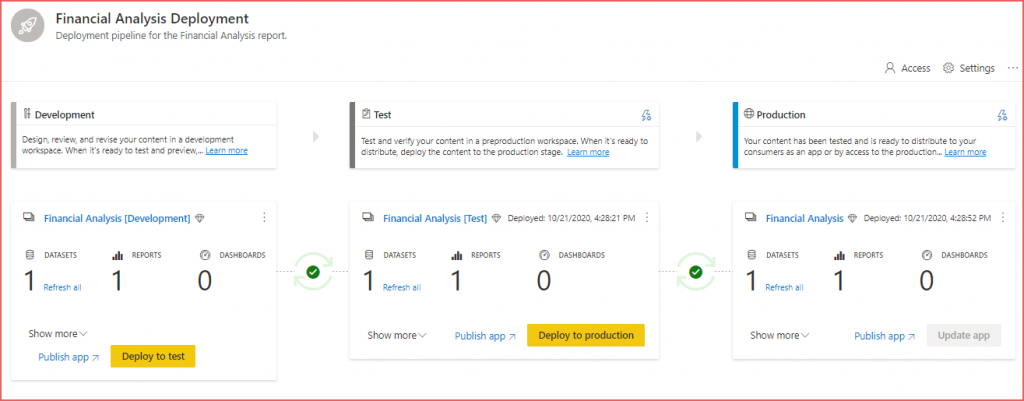
Once the deployment is completed, the Deployment Pipeline should look like the following image.
Considerations
The how-to in this blog post has focused on a simple scenario whereby a report has been deployed to a Development Workspace and deployed to the Test and Production Workspaces, however there are further considerations.
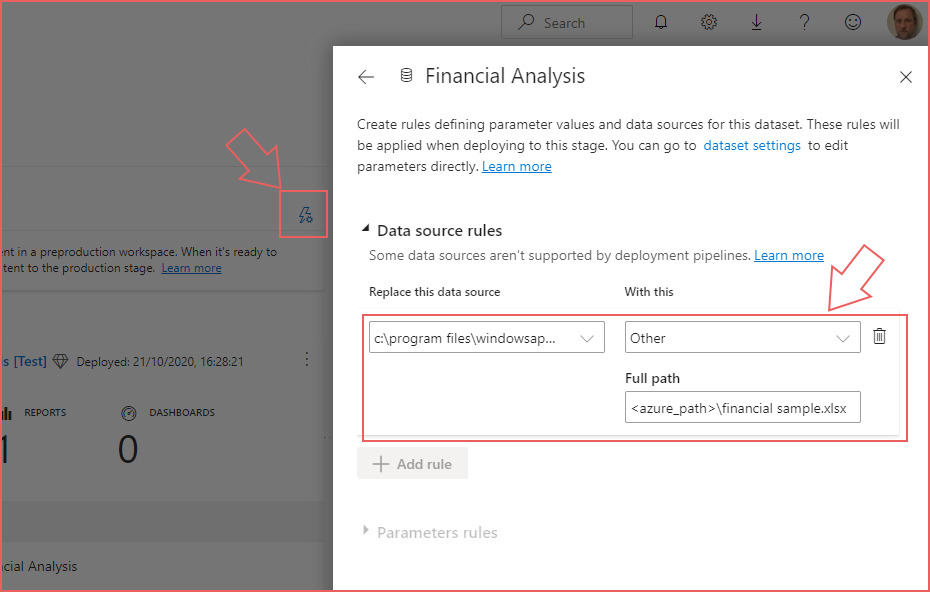
Parameters & Data Source Rules
Configuration of data sources and parameters is possible by clicking the trigger icon on the Test and Production pipelines. The deployment settings pane appears allowing you to configure data source connections and any parameters in the report. This allows you to repoint data sources to appropriate development, test and production sources.
Remove Workspace from Embedded Capacity
The Workspaces only need to be assigned to an Embedded capacity when the Deployment Pipeline functionality is required. E.G. a Report Creator deploys a report to a Development Workspace, a pipeline compares the differences between the Development and Test stages allowing the artefacts to be deployed to the Test stage. At this point the Workspaces can be removed from the Embedded capacity and the Embedded capacity can be paused to stop charges.
Once the changes have been verified in the Test Workspace, the Embedded capacity can be unpaused, Workspaces reassigned to the Embedded capacity and the pipeline can compare between the Test and Production stage. Once compared, the changes can be deployed and the Workspaces removed from the Embedded capacity.
Pipeline Stage Workspace Assignment Considerations
It is possible to “back-fill” the Test and Development stages from the Production stage if the Production stage is assigned to a Workspace that already contains content and that Workspace is used for production. However the following are considerations:
- If the Production Workspace contains “thin” reports which are connected to shared datasets in another (non-premium) Workspace, then the back-fill process will succeed but any deployment attempt to the Development stage from Power BI Desktop will fail due to a sync error.
Power BI Desktop Deployment to Pipeline Stages
When deploying from Power BI Desktop, any stage in the Deployment Pipeline can be deployed to which will create a synchronisation issue. E.G. a Report Creator deploys a report directly to the Test stage, bypassing the Development stage. This will now cause an issue with synchronising changes and should be avoided by applying appropriate security settings.
Conclusion
Deployment Pipelines represents a native feature within the Power BI Service to allow an organisation to apply a 3-stage release process to ensure new and changed Power BI Dashboards, Reports and Datasets are deployed via a workflow to allow separate development, testing and deployment Workspaces. The feature is Premium only, however it is available in the Azure Power BI Embedded capacity and can be leveraged by organisations with an Azure subscription.
References
- https://github.com/datahai/powerbideployment
- https://powerbi.microsoft.com/en-us/power-bi-embedded/
- https://docs.microsoft.com/en-us/power-bi/create-reports/deployment-pipelines-overview
- https://docs.microsoft.com/en-us/power-bi/create-reports/deployment-pipelines-get-started
Aggregations (1) ALM (1) Architecture (2) Bicep (1) C# (1) Certification (5) Community (2) Databricks (4) Data Engineering (1) Data Factory (5) Dataflows (5) Data Flows (3) Data Lake (2) Data Lakehouse (1) Data Saturdays (1) Data Warehouse (3) Dedicated SQL Pools (2) ebook (1) Enterprise (1) Event Hubs (1) Events (1) Framework (1) Frameworks (1) Learning (1) Logical Data Warehouse (3) Power BI (15) Power Query (1) Purview (1) Real-time (2) Round-up (1) Security (2) Self-Service BI (1) Serverless SQL (3) Sessions (2) Snowflake (1) SQL Serverless (14) Streaming (2) Synapse Analytics (20) Synapse Pipelines (1) Training (1) TSQL2sday (1) Tutorial (3)
- T-SQL Tuesday #163
- Cloud Formations: A New Training Initiative Led By Microsoft MVPs
- A New Badge…But Is It Useful? Databricks SQL Analyst Accreditation

- 2021 Review and Thanks

- Applying the Azure Well-Architected Framework to Azure Synapse Analytics
- Optimising Power BI with Synapse Analytics Serverless SQL Pools Session
- Connecting Power BI to Azure SQL Database using Private Endpoints
- Costs and Estimated Savings using Azure Synapse Analytics Pre-Purchase Plans

- Snowflake Hands On Essentials – Data Warehouse

- Applying the Azure Well-Architected Framework to Azure Synapse Analytics